From nothing to rowing, in 6 steps
Everything you need to turn an ESP32-S3 board into a wireless bridge for your Concept2 PM3. Work through it in order, or jump straight to the bit you need - your progress is remembered on this device.
Firmware installed. Now unplug the board and plug it back in, this time without holding BOOT, so it starts running the firmware instead of sitting in flashing mode. It will not show up over Bluetooth in the next step until you do.
Before we can do anything we need to buy a device to run all this on. The board you want is the ESP32-S3-N16R8. A quick Google search should turn it up easily. It should cost $10 or less, but pricing varies, so look around a bit.
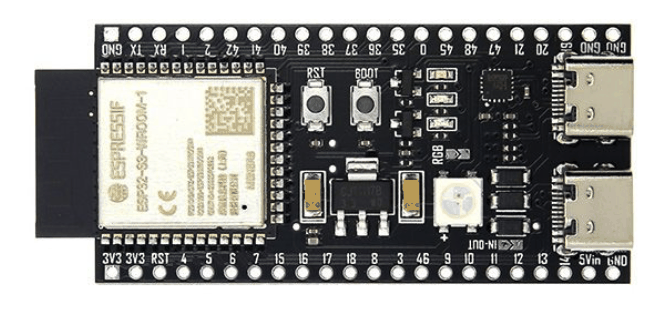
Get the N16R8 version specifically. It needs 16 MB of flash and 8 MB of octal PSRAM. Cheaper variants (N8R2, or 4 MB boards) do not have room for the firmware's partition layout and will not work.
Look for ESP32-S3-DevKitC-1 N16R8, or any ESP32-S3 board whose listing says both "16MB Flash" and "8MB PSRAM".
You will also need a USB cable to connect the board to your computer for the one-time flash in step 3, and a cable to connect the board's USB-C port to the USB port on your PM3.
Turn the board over. Below the words USB-OTG there are two tiny pads with a gap between them. They need to be joined.
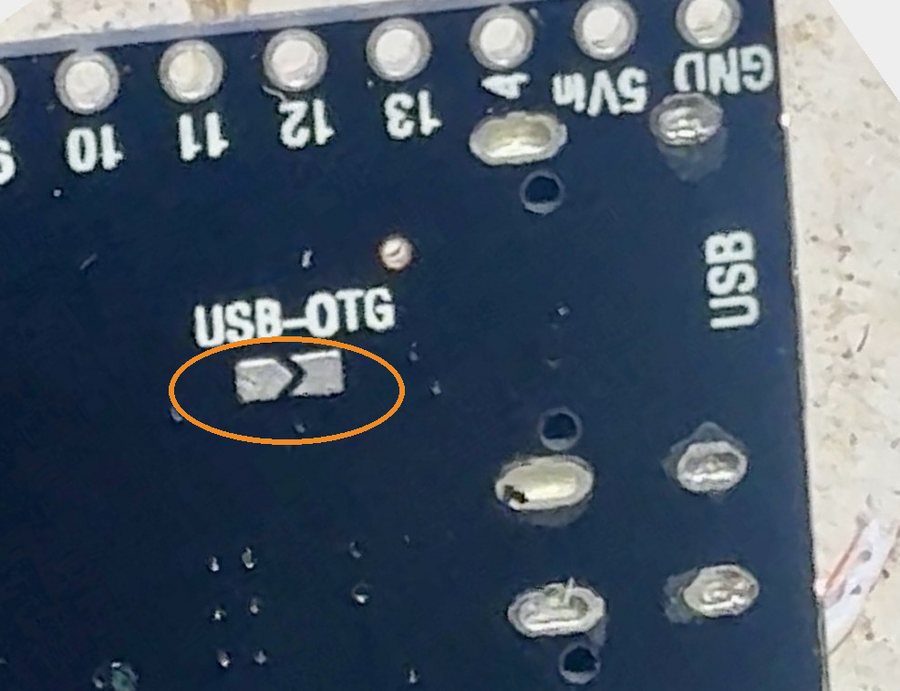
A blob of solder across the two is the tidy way. If you have no iron, be creative: a scrap of tinfoil pressed over both pads and glued down works fine. It only has to touch both pads and stay there.
Nothing works without this. The jumper is what connects the board's 5V rail to its USB-C port. Leave it open and the port never sends power to the PM3, so the monitor stays dark and there is nothing to talk to.
Some boards arrive with it already bridged. Have a look before you reach for the iron, and if it is closed, just tick this step off.
I want the PM3 to fall asleep on its own
A plain bridge means the PM3 has 5V whenever this device is powered, and a PM3 that can see 5V never sleeps. That is fine for most people, and it is what the rest of this guide assumes.
If you would rather it slept, build the small GPIO-controlled switch from the wiring guide instead. It sits in the same two pads and does the same job, except the firmware can turn it off. Do that instead of bridging them, not as well.
After this, the device updates itself wirelessly - you should never need a cable again.
- Use Chrome or Edge on a desktop computer. Web Serial is not available in Firefox, Safari, or any mobile browser.
- Plug a USB cable into the port marked COM on the board - not the USB-C port that the rowing monitor uses.
- Hold the BOOT button while plugging it in, so the board starts up ready to be flashed. This can be fiddly - if the install fails, unplug, then plug back in while still holding BOOT.
- Close anything else that might hold the port open (a serial monitor, ESPHome's "Logs" view).
When the install finishes, the dialog closes itself and this page carries on. If one is still sitting there saying "Installation complete!", just close it - its own "Next" button loops back to the install screen rather than continuing.
Optional, but recommended. Rowing itself does not need WiFi - ErgData, EXR, MyWhoosh, Kinomap and the rest all talk to the device over Bluetooth. WiFi is what gives you the built-in web interface, saved workout history, Strava uploads, and automatic firmware updates.
Just flashed it? Unplug the board and plug it back in first, without holding BOOT. Until you do, it is still sitting in flashing mode and will not appear over Bluetooth.
This browser has no Web Bluetooth, so it cannot do the setup here. Use Chrome or Edge on Android, Windows, Mac or Linux - or follow the manual method below, which works everywhere including iPhone.
No networks found. Enter yours by hand below.
No Bluetooth, or on an iPhone? Set up WiFi by hand
On your phone or laptop, open its WiFi settings and join the network the device creates: PM Connector 5000 Setup (no password).
A sign-in page should pop up automatically. If it does not, open
http://192.168.4.1 in a browser.
Pick your home network from the list there, enter its password, and the device saves it and reconnects on its own.
The device serves its own web interface - live rowing data, workout history, settings and firmware updates. It has no screen to show you its address, so here is how to find it.
Try http://pm-connector.local first. That works on iPhone, iPad, Mac and Linux, and sometimes on Windows. If it does not load, your network is blocking the automatic name lookup - find it over Bluetooth instead.
Found the device, but it is not on WiFi yet. Go back to step 4 and set that up first.
This
browser has no Web Bluetooth. On iPhone and iPad, use the
pm-connector.local link above - it works well there.
- Connect the board's USB-C port to the USB port on your PM3. This is the other port from the one you flashed through.
- Power the board. The PM3 wakes up and the two start talking within a few seconds.
- Open your app and pair with the monitor - it appears as PM5 <serial>, using your rower's own serial number.
Known to work with ErgData, EXR, MyWhoosh, Kinomap, the Concept2 Logbook and Home Assistant. Anything that speaks to a PM5 over Bluetooth should find it.
That is everything. Your PM3 is wireless. Enjoy the row.